Making Desserts with Less Processed Sugar

Almost all of us love desserts!

Desserts are often loaded with processed sugar, making them a not-so-healthy treat. But there are ways to make desserts using less processed sugar, without sacrificing taste. Here are some tips for making healthier desserts that the whole family will enjoy.

Sorghum

Cut back on your processed sugar intake by incorporating delicious, unrefined sugars (naturally smart sugars) in your desserts. Natural “smart sugars” like coconut sugar, maple syrup, honey, dates, sorghum and molasses are all delicious and nutritious alternatives to overly processed white sugar. These delicious natural sweeteners can enhance the flavor of baked goods and give you a more wholesome treat. Plus, they often contain valuable nutrients such as zinc, potassium and magnesium that when consumed in moderation can help satisfy cravings without filling you with empty calories. So why not try using less processed sugar (naturally “smart sweeteners”) in your favorite desserts? Your taste buds – and metabolism – will thank you!

Dates

There are many sugar substitutes out there but most of those are processed also. There have been no studies conducted, at the time of this writing, indicating long-term health effects. Why risk using unknown/new fad sugars? My suggestion is to use “smart sweeteners” which will reduce health risks by consuming excess processed sugars greatly.

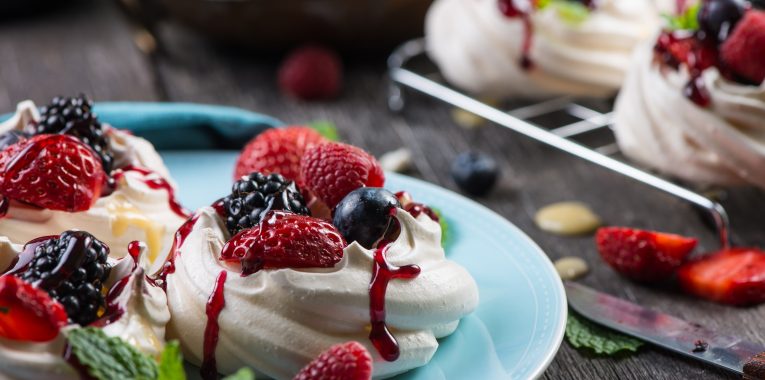
One recipe that we will do in the next blog post is mini Pavlovas. I’m actually experimenting with this recipe now so that we can add it to our kids cooking club and holiday baking programs. It is important to note that when using these alternatives, the amount of temperature, the ratio of smart sugar to another ingredient, and the cooking time may be adjusted. But your experimenting will pay off big time. Taste really won’t be affected and you will be a “family hero” just for trying.
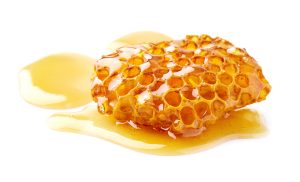
Natural wild honey varies in flavor based on where it came from. Let adventures begin!

For example, when substituting honey for sugar in a recipe, use only half or two-thirds of the amount of sugar called for in a recipe because honey is sweeter than sugar. Additionally, if using honey, dates or maple syrup for baking it is important to reduce the oven temperature by about 25 degrees Fahrenheit and increase the cooking time slightly. This will prevent burning the dessert or creating bitter notes.
Kitchen Safety for the Holidays and Always

Kitchen safety with kids is important. Children are curious by nature and will want to explore your kitchen. It’s important to take some precautions to ensure their safety while in the kitchen. In this blog article, let’s look at 8 suggestions to keep kids safe (even during the holidays) in the kitchen.

1. Teach kids about Kitchen Safety Rules

It is important to teach your kids the kitchen safety rules. Explain to them why each rule is important and how to stay safe in the kitchen. Some of the most important kitchen safety rules for kids include:

– Stay clear of hot stoves and ovens

– Never reach for anything that is hot – use a pot holder or oven mitt to protect your hands

– Be careful when using sharp knives – always cut away from your body

– Wash hands thoroughly after cooking


2. Keep Kids Away from Kitchen Appliances and Tools

It is important to keep kids away from kitchen appliances and tools, especially during use. Kitchen appliances can be dangerous, especially if they are not used properly. Keep kids away from the stove, oven, knives, blender, and other kitchen tools. Sometimes it is very interesting for kids to stick their heads near the mixer to see food transform. Just be sure it is done safely. Adults should not text, watch TV or run to change a radio station while this is happening. Which leads me to #3…


3. Supervise Kids in the Kitchen

Pre-teen girl standing at the hob in the kitchen preparing food with her grandmother and mother, close up, selective focus

It is important to supervise kids in the kitchen at all times. Do not leave them alone in the kitchen, even for a minute. If you need to step away, take them with you. It is also important to make sure they are staying safe while cooking. Watch them closely as they cook and help them with any tasks they are not familiar with. Accidents only take a second. Please be vigilant. Avoid distractions. Distractions make recipes take longer anyway.


4. Keep Kitchen Floors Clean

A cute golden retriever lying on the floor in a messy kitchen

Keep your kitchen floors clean and free of spills and messes. This will help prevent accidents from happening. Sweep or vacuum regularly and mop as needed. Make sure to keep any cords out of the way so kids don’t trip over them. We joke with kids about falling over their things at night while heading to an unexpected bathroom break while sleeping. They get this!


5. Use Kitchen Appliances Properly

It is important to use kitchen appliances properly to avoid accidents. Follow the instructions that came with the appliance and use caution when operating it. Do not put undue stress on an appliance – if it seems like it’s struggling, stop using it.


6. Store Kitchen Appliances Properly

When not in use, store kitchen appliances safely out of reach of kids. This includes knives, blenders, ovens, and other appliances. Lock up any hazardous materials so kids can’t get to them.


7. Use Appropriate Cutlery

Kids should use appropriate cutlery when cooking – no sharp knives! Teach them which utensils are appropriate for their age and ability level, and make sure they are using them correctly.


8 . Avoid Hot Surfaces

When cooking on the stovetop, use pots and pans with handles that extend away from the heat source. This will help keep you safe from most basic kitchen accidents.


Hope this short list helps. If adults keep these in mind, kids will be much safer. Discussing kitchen and food safety is very important and lets kids feel involved. Have fun and be safe.

Savory Baking – Any Time of Year

When Chefsville programs have baking in them, most participants are amazed that there is “Savory Baking”. The thought never occurred to them that not everything needs to be sugar, sugar and more sugar. The exceptions are breads and yeasted loaves. Everyone knows about those savory items.

Many bakers and chefs enjoy “savory baking”. There are so many things that can be made. Here are a few:

  • Quick Breads
  • Scones
  • Pastries
  • Pies
  • Tarts & Galettes
  • Batters that bake well
  • Crackers
  • Flatbreads
  • Rolls
  • Breadsticks and more
  • Yeasted loaves

For this kind of baking, flavoring opportunities are almost endless. A baker may use herbs and spices, fresh vegetables and fruits, nuts and seeds. Even cheeses and meats are a welcomed blend in savory baking.

While baking savory, one can learn the difference and uses between baking “soda” and baking “powder”. Also, celebration baking comes into play here with incredible scones, loaves of bread, and different uses for pastry doughs like puff pastry and phyllo dough. Many cuisines can be celebrated when savory baking.

Savory baking can also be done using a dutch oven or cast iron skillet.

Depending upon what is being made, learning to make food taste wonderful with a world of techniques is just amazing. At Chefsville, we tell our program goers that cooking is about shapes, sizes, colors, and textures. Certainly, the world of savory baking opens this exploration opportunity up for us.

Baking is also about shapes, sizes, colors, flavors and textures.

Other than the actual baking, we can have lots of fun deciding and making things that add to our savory baked items. Such as compound butter. Compound butter is room-temperature butter to which flavors are added. For example, take a stick of butter and add to it 2 tablespoons of fresh chopped herbs, and/or the zest of lemon, lime, or orange.

Did you know that Martha Washington (wife of George Washington) would make orange butter and biscuits? People would come from all over the country to where they lived to purchase her baked goods and the butter she made. More on Washington’s chefs can be learned from our program “Celebrate African American Cooking Greats” which is available to classrooms and assembly programs to schools.

Celebrating the seasons through baking is wonderful for educating, exploring and discovering how to bake especially with family.

With savory baking you can spice things up, use herbs and butters, cheeses, meats, vegetables, nuts, seeds, fruits and get saucy with thicker sauces for that oozy, yummy, dipping crave that makes food fun and interactive.

Please let us know what you can come up with and your favorite things that go under “savory baking” topic.

Vegan Baked Product Problems and Tips

With the rise of vegan cooking and baking, I get out and about to see what people are making.

Sometimes I run into restaurant owners, chefs, cooks and clients. What I have found is that most places are not aware of the cooking basics to make premium products. This means that consumers are paying premium prices for low-quality products. That bothers me.

Over 20 years ago, food science and research and development became quite the fad. A major example is America’s Test Kitchen. International cooking schools also have online classes to teach the basics. Online with YouTube, there are many videos as well.

The main topic I want to discuss is that for many vegan and vegetarian baking, there is so much oil and grease on my hands or plate.

This is really gross when considering I am not eating a broken sauce, but a pastry item such as bread or muffin.

The basic that got missed is that establishments that make these products aren’t keeping in mind the temperature of the mixtures they make before they bake them. If the dough is too hot, oils and butter will not incorporate correctly. If the dough is too cold, the internal temperature of the final product is not correct for the item to be “done” properly. Also with many doughs, the purveyor doesn’t allow the proper time for the dough to rise. This means I am purchasing a really dense item. If the price is by weight, then I get ripped off.


Baking Tips

Tip 1: Allow time for the dough to rise;

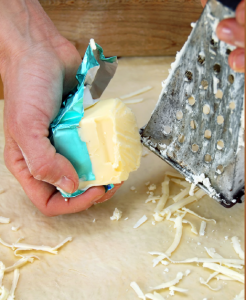
Tip 2: Freeze the butter or fat; then use a box grater to grate the fat. This will make pie dough flaky and chocolate can even be grated to help cool down chocolate that is being tempered.

Tip 3: To handle cakes easier, bake your cakes and freeze them anywhere from 24 hours to seven days.
Freshly baked cakes crumble too much plus they often break and tear when you are working with them. When you are ready to start working on them remove them from the freezer and let them thaw halfway.

Tip 4: When the cakes are semi-frozen it is easier to make straight cuts through them and you will not create anywhere near as many crumbs as you would with a freshly baked cake. Cakes with higher percentages of fat will not be affected by the cold temperature as cakes low in fat will be, such as angel food cake. Always wrap the cakes with food wrap.

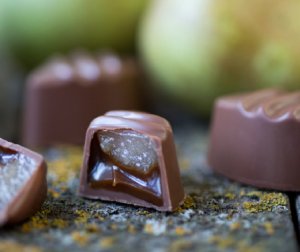
Tip 5: Bon Bons – consider the filling and chocolate outside. For fillings that have a mild or medium flavor profile, use a white or milk chocolate couverture for the shells. For a filling that either has a strong flavor profile or is sweet, choose a dark couverture.

Apple Tart

Apple Tart

5 from 1 vote
Prep Time 10 minutes
Cook Time 45 minutes
Total Time 55 minutes
Course Dessert
Cuisine French
Servings 6 People

Ingredients
  

Dough

  • 1 Cup Flour
  • 1/2 Teaspoon Sugar
  • 1/8 Teaspoon Salt
  • 6 Tablespoon Butter Softened
  • 3 1/2 Tablespoon Chilled Water

Filling

  • 5 Apples (Peeled, Cored, Sliced)
  • 4 Tablespoon Butter melted
  • 5 Tablespoon Sugar + ½ Teaspoon Cinnamon
  • 2 Teaspoon Lemon Zest

Instructions
 

  • In a food processor combine flour, sugar, salt, water, and butter pulse until coarse crumble is formed.
  • For the filling peel, core, and slice apples about ¼” thick.
  • In a bowl toss sliced apples with sugar, cinnamon, and lemon zest
  • Roll out tart dough into pan, trim edges.
  • Layer apples around tart pan, brush melted butter over tart
  • Sprinkle with sugar and place tart pan on sheet tray.
  • Bake in the center of the oven for 45 minutes.

Notes

Tools Necessary-
  • Food Processor
  • Measuring cups and spoons
  • Chef’s Knife
  • Cutting Board
  • Sheet Tray
  • Pastry Brush
  • 9” Tart Pan
Tried this recipe?Let us know how it was!
Apple Strudel

Apple Strudel

Apple Strudel

Apple strudel consists of an oblong strudel pastry jacket with an apple filling inside. Apple strudel dough is a thin, elastic dough. The oldest known strudel recipe is from 1696, a handwritten recipe housed at the Wienbibliothek im Rathaus. Whether as a type of sweet or savoury layered pastry with a filling inside, the strudel gained popularity in the 18th century.
3 from 3 votes
Prep Time 15 minutes
Cook Time 20 minutes
Total Time 35 minutes
Course Dessert
Cuisine Austrian
Servings 12 People

Ingredients
  

Dough

  • 1 large egg
  • 2 tablespoons melted butter
  • 1/2 teaspoon salt
  • 3 cups all-purpose flour

Filling

  • 4 to 5 apples, any tart variety peeled, cored & thinly sliced
  • 2 tablespoons fresh lemon juice
  • 1/2 cup walnuts chopped
  • 1/4 cup raisins
  • 1/4 cup brown sugar
  • 1 teaspoon ground cinnamon
  • 1/4 cup fresh cake or bread crumbs
  • 1/2 cup butter melted

Instructions
 

  • To prepare the dough: Whisk the egg, butter, and salt with about 3/4 cup cold water. Combine just enough of the liquid with the flour to make a soft dough. The dough should feel resilient but remain very slightly sticky. Drizzle in a tablespoon or more water if the dough is too ragged, or sprinkle in a small amount of flour if it is too moist and mushy. Knead for five minutes by hand, (2 minutes if using an electric mixer) until smooth, soft and warm. Form it into a smooth ball, wrap in plastic film, and let rest for at least 1 hour, preferably 4 hours.
  • To prepare the filling: Toss together in a medium sized bowl, the apple slices and lemon juice. Add the walnuts, raisins, sugar, and cinnamon and toss until evenly coated.
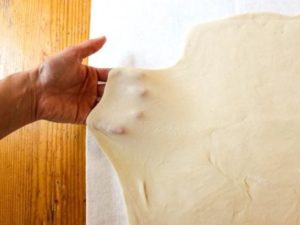
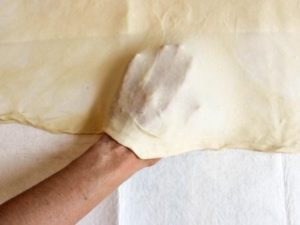
  • To assemble: Spread a table with a clean cloth and sprinkle evenly with flour. Place the dough in the center of the table, flatten with your palms into a 1-inch thick round, and then begin stretching the dough from the center to the edge. Use a combination of the sides of your hands and the tops of your knuckles to work the dough gently and evenly. Continue stretching the dough until you can see light through it. If there are occasional holes at the center, just pinch together to seal. Don't worry about holes or tears near the edge of the dough.
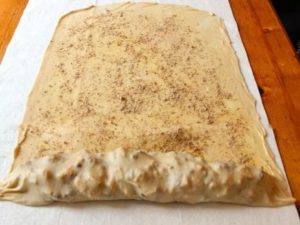
  • Brush the entire strudel dough evenly with butter. Sprinkle half the crumbs on one half of the dough, and on the same side arrange the apple filling in a long row close to the edge of the dough. Sprinkle with the remaining crumbs. Fold over the edge and roll the strudel into a log shape, using the cloth to help support and roll the pastry. Tuck in the sides and roll up completely, arranging the strudel seam side down.
  • Transfer carefully to a buttered or parchment-lined baking sheet, curve the log into a crescent shape, if needed, to fit the roll onto the pan. Brush with butter and chill for at least 30 minutes (or overnight).
  • Preheat the oven to 350°F. Bake the strudel until golden brown, 30 to 40 minutes. Let cool slightly before cutting and serving.

Notes

Tools Necessary-
Mixer with paddle or pastry marble
Medium bowl
Whisk
Measuring cups and spoons
Spatula
Plastic Wrap
Table Cloth
Adult Supervision
Tried this recipe?Let us know how it was!